
Table of Contents
- Objective
- Pre-Conditions
- Steps to Execute
- Step 1: Select SKUs
- Step 2: Paste Keywords
- Step 3: Assign UNIQUE Words
- Step 4: Allocate Bid Amounts
- Step 5: Group Keywords
- Step 6: Set Campaign Budget
- Step 7: Set Bidding Strategy
- Step 8: Set Top of Search Percentage
- Step 9: Set Strategy Name
- Step 10: Press STEP 2 Button
- Step 11: Press STEP 3 Button
- Step 12: Create Campaigns
- Post-Conditions
Objective #
To create campaigns for multiple SKUs by grouping keywords effectively, ensuring that keywords are organized into distinct groups for targeted advertising.
Pre-Conditions #
- The user has access to the Campaign Creation Automation Tool.
- The user has multiple SKUs and corresponding keywords ready for campaign creation.
Steps to Execute #
Step 1: Select SKUs #
- Action: In the “ALL UNIQUE KW” sheet, enter each SKU in Column A according to the number of keywords associated with it:
- If SKU 1 has 10 keywords, repeat SKU 1 ten times in Column A.
- If SKU 2 has 8 keywords, repeat SKU 2 eight times, and so on for additional SKUs.
- Outcome: Each SKU is listed multiple times based on the number of keywords, allowing for proper association.
Step 2: Paste Keywords #
- Action: In Column B, paste the corresponding keywords next to each repeated SKU entry.
- Outcome: Each SKU is now linked to its respective keywords.
Step 3: Assign UNIQUE Words #
- Action: For each keyword in Column B, enter a UNIQUE word in:
- Column C for Exact match,
- Column D for Phrase match,
- Column E for Broad match campaigns.
- Outcome: UNIQUE words are assigned for each match type, facilitating campaign differentiation.
Step 4: Allocate Bid Amounts #
- Action: In Columns I, J, and K, input the bid amounts for Exact, Phrase, and Broad match types respectively for each SKU and keyword.
- Outcome: Bid amounts are set for each campaign type.
Step 5: Group Keywords #
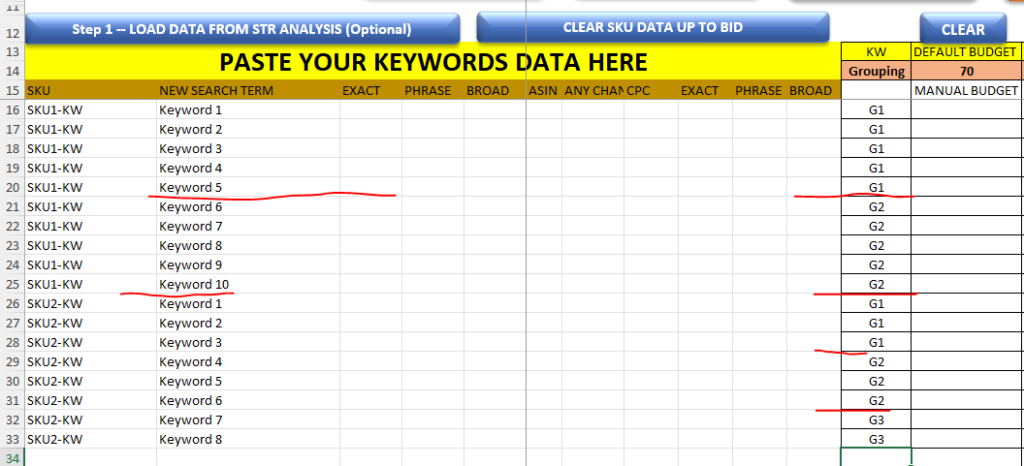
- Action:
- For SKU 1, for the first 5 keywords, enter “G1” in the grouping column, and for the next 5 keywords, enter “G2.”
- For SKU 2, for the first 3 keywords, enter “G1,” for the next 3 keywords, enter “G2,” and for the last 2 keywords, enter “G3.”
- Outcome: Keywords are grouped appropriately for campaign targeting.
Step 6: Set Campaign Budget #
- Action:
- If you want to assign the same budget to all SKUs, set the budget in the header (budget column).
- If each SKU requires a different budget, enter the specific budget for each SKU in the respective budget column.
- Outcome: Campaign budgets are established according to your requirements.
Step 7: Set Bidding Strategy #
- Action: In Column N, select the desired bidding strategy for each SKU. The default is “Dynamic Bid (Down only).”
- Outcome: Bidding strategies are configured for the campaigns.
Step 8: Set Top of Search Percentage #
- Action: In Column O, specify the percentage for “Top of Search” for each SKU.
- Outcome: Top of Search percentages are defined for the campaigns.
Step 9: Set Strategy Name #
- Action: If desired, enter a strategy name in Column R for each campaign’s naming structure.
- Outcome: Strategy names are included for better identification of campaigns.
Step 10: Press STEP 2 Button #
- Action: Click on the “STEP 2 CLEAR KW” button.
- Outcome: This action generates the necessary naming structures for the campaigns.
Step 11: Press STEP 3 Button #
- Action: Click on “STEP 3 PREPARE A KW FOR 1 CAMPAIGN 1 KEYWORD.”
- Outcome: The tool prepares the campaigns for single keyword targeting.
Step 12: Create Campaigns #
- Action: Sequentially press the following buttons:
- STEP 4.1: “CREATE EXACT MATCH CAMPAIGNS”
- STEP 4.2: “CREATE PHRASE MATCH CAMPAIGNS”
- STEP 4.3: “CREATE BROAD MATCH CAMPAIGNS”
- STEP 6.1: “CREATE FINAL CAMPAIGN WITH NEGATIVE” (if using negative targeting)
- STEP 7: “SAVE FINAL UPLOAD SHEET AT DESTINATION FOLDER”
- Outcome: Campaigns for all SKUs with their respective keywords and match types are successfully created and saved.
Post-Conditions #
- Campaigns for all selected SKUs are created with their respective keywords, bid amounts, budgets, and targeting strategies.
- Keywords are grouped effectively for targeted advertising.
- The final upload sheet is saved in the designated folder, ready for upload to Amazon.


