
Table of Contents
- Purpose
- Scope
- Procedure
- Step 1: Open the Tool
- Step 2: Access the Main Sheet
- Step 3: Import Data
- Step 4: Exclude Portfolios and Campaigns
- Step 5: Update Minimum Budget and Bid
- Step 6: SP KW & ASIN Bleeders Criteria
- Step 7: SP High ACOS KW & ASINs Criteria
- Step 8: SP Bid Up for Good Performing KW and ASINs
- Step 9: SP Bid Placement % Adjustment
- Step 10: SP Campaign or Targeting Pause
- Step 11: SP Campaign Budget Control
- Step 12: Execute Optimization Processes
- Step 13: Process for Sponsored Brand and Display
- Step 14: Save Final Files
- Conclusion
Purpose #
This SOP outlines the detailed steps to effectively utilize the Amazon Advertising Tool for optimizing advertising campaigns on the Amazon platform. It is designed to guide users through the process, ensuring clarity and efficiency.
Scope #
This procedure applies to all users of the Amazon Advertising Tool who are involved in managing and optimizing advertising campaigns.
Procedure #
Step 1: Open the Tool #
- Launch the Tool: Begin by opening the Amazon Advertising Tool on your computer.
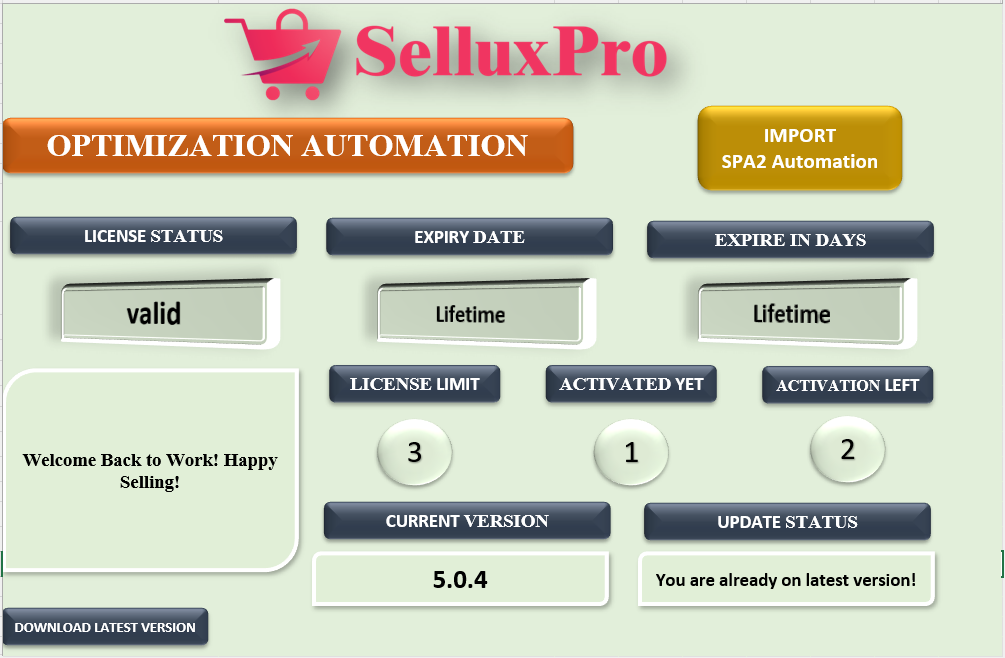
- License Verification: Upon opening, the tool will check if your license is valid. If it is, a success message will appear on your screen.
- Acknowledge the Message: Click the “OK” button to proceed.
- Access the Dashboard: Once the tool successfully opens, you will see the main dashboard. This dashboard displays important information regarding the validity of your tool and other key details necessary for your advertising campaigns.
- Import Automation: Locate and click on the button labeled “IMPORT SPA2 AUTOMATION.” This action will display all the sheets that you will need for your optimization processes.
Step 2: Access the Main Sheet #
- Navigate to the MAIN Sheet: Click on the “MAIN” sheet tab. This is where you will manage all subsequent processes related to your advertising campaigns.
Step 3: Import Data #
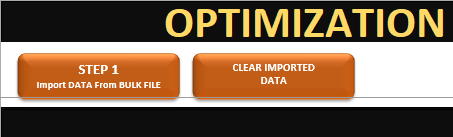
- Initiate Data Import: In the “MAIN” sheet, look for the button labeled “IMPORT DATA FROM BULK FILE.”
- Select Bulk File: Click this button, and a file selection dialog will appear. Choose the appropriate bulk file that contains your advertising data.
- Data Import Confirmation: Once you select the file, the tool will automatically import the data. You should see a confirmation message indicating that the data has been successfully imported.
Step 4: Exclude Portfolios and Campaigns #
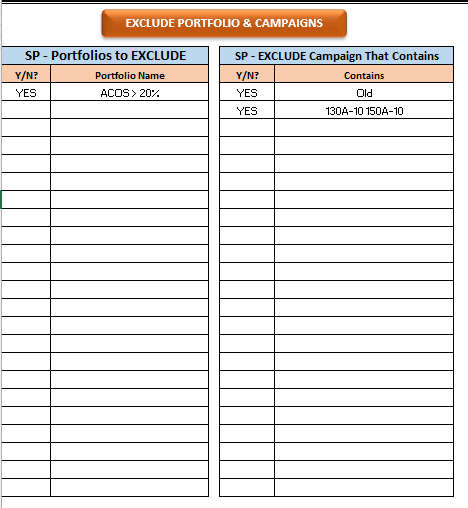
- Exclusion Criteria for Portfolios: If you wish to exclude a specific portfolio from your analysis, find the Portfolio table. In the second column, enter the full name of the portfolio you want to exclude. In the first column next to it, write “YES.”
- Exclusion Criteria for Campaigns: If you also need to exclude a specific campaign, navigate to the Campaign table. In the right column, enter a unique word or phrase that is not used in any other campaign name. Alternatively, you can enter the full campaign name.
- Filling the Table: It is important to note that you do not need to fill both tables; only fill in the ones relevant to your exclusions.
- Execute Exclusion: After filling in the necessary information, click the button labeled “EXCLUDE PORTFOLIO & CAMPAIGNS.” This will update the tool to exclude the specified portfolios and campaigns from future analyses.
Step 5: Update Minimum Budget and Bid #
- Adjust Budget and Bids: Based on your country’s selling account and the marketplace you are operating in, update the minimum budget and bid amounts. This ensures that your campaigns remain competitive and aligned with marketplace standards.
Step 6: SP KW & ASIN Bleeders Criteria #
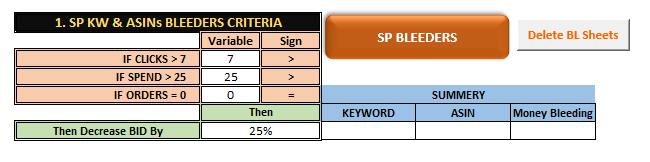
- Define Bleeders: To optimize your advertising efforts, you need to identify “bleeders.” These are targets that are not performing well. Set the following criteria:
- Clicks: Greater than 7
- Spend: Greater than 25
- Orders: Equal to 0
- Bid Reduction: Specify the percentage by which you want to reduce the bids for these bleeders (e.g., reduce by 25%).
- Process Bleeders: After setting the criteria, click the “SP BLEEDERS” button. This will prompt the tool to generate an “SP UPLOAD” file that reflects these changes.
Step 7: SP High ACOS KW & ASINs Criteria #
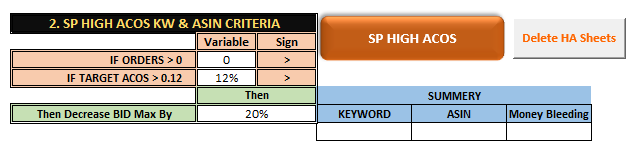
- Set High ACOS Criteria: For this step, you will set criteria to identify high ACOS (Advertising Cost of Sales) targets. Ensure that:
- Orders: Always greater than 0
- ACOS: Define according to your needs (e.g., if ACOS > 12%, it is considered high).
- Bid Reduction Specification: Specify the percentage by which you want to reduce the bids for these high ACOS targets.
- Generate Upload File: Click the “SP HIGH ACOS” button. The tool will generate an upload file based on the criteria you set.
Step 8: SP Bid Up for Good Performing KW and ASINs #
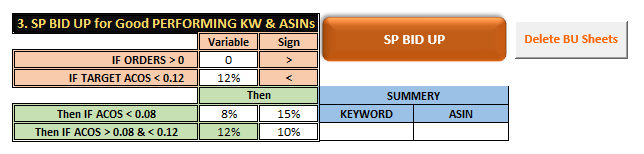
- Identify Good Performers: Determine which targets are performing well. These should have:
- Orders: Greater than 0
- ACOS: Less than the targeted ACOS (e.g., ACOS < 12%).
- Bid Increase Specification: Specify how much you want to increase their bids. For example, if ACOS < 12%, increase by 10%.
- Range-Based Increases: You can also set range-based increases. For example, if ACOS < 8%, increase by 15%.
- Execute Bid Increase: Click the “SP BID UP” button to apply these changes.
Step 9: SP Bid Placement % Adjustment #
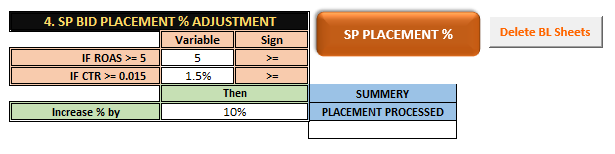
- Identify Placement Adjustments: Analyze the ROAS (Return on Advertising Spend) and CTR (Click-Through Rate) to determine if adjustments are needed:
- ROAS: Should be greater than or equal to 5
- CTR: Should be greater than or equal to 1.5%
- Specify Adjustment Percentage: Indicate the percentage by which you want to increase the placement percentage for these targets.
- Apply Adjustments: Press the “SP PLACEMENT %” button to execute the placement adjustments.
Step 10: SP Campaign or Targeting Pause #
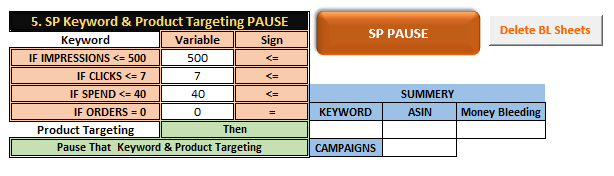
- Select Pause Option: Decide whether you want to pause targeting or campaigns. Note that you can only select one option at a time.
- Set Criteria for Pausing: Establish criteria based on impressions, clicks, spend, and orders that would trigger the pause.
- Execute Pause: Click the “SP PAUSE” button to implement the pause for the selected campaigns or targeting.
Step 11: SP Campaign Budget Control #
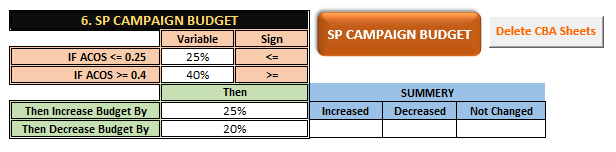
- Budget Control Based on ACOS: If you want to control the budget of your sponsored campaigns based on ACOS, set the following criteria:
- If ACOS <= 25%, increase the campaign budget by 25%.
- If ACOS >= 40%, decrease the campaign budget by 20%.
- Apply Budget Control: Click the “SP CAMPAIGN BUDGET” button to apply these budget adjustments.
Step 12: Execute Optimization Processes #

- Combined Optimization: You can choose to execute steps 1 through 6 simultaneously or as needed based on your campaign requirements. It is recommended to use them according to your understanding of the campaigns.
- Finalization of Processes: After completing the desired processes, navigate to the top of the screen and click the “STEP 2.41 CREATE SP FINAL” button. This action will generate two files:
- SP BACK UP: A backup file that stores your previous settings.
- SP FINAL UPLOAD: The new upload file that reflects the changes made.
Step 13: Process for Sponsored Brand and Display #
- Similar Processes: The same optimization processes can be applied to Sponsored Brand and Display campaigns. Follow the same steps to create backup and final sheets for these campaign types.
Step 14: Save Final Files #
- Saving Your Work: After completing all optimization processes, click the “STEP 5 SAVE FINAL FILE AT DESTINATION FOLDER” button. This will prompt you to select a folder on your computer to save the useful sheets.
- Upload to Amazon: Once saved, you can upload these files to Amazon for your advertising optimization efforts.
Conclusion #
Thank you for using our tools for your Amazon advertising! By following this SOP, you can effectively manage and optimize your advertising campaigns, ensuring better performance and results.


